In addition to the native facilities within the Guardium product used for showing before and after values of DML, getting before/after values for Oracle can be accomplished through the use of Oracle Streams and through the use of Guardium’s external data connector (upload) facility. Streams are used to create change records for any change that affects a sensitive column, and the upload job is used to bring the data into the Guardium repository, where you can issue reports, combine the data with other details, and add these reports into the sign-off process.
This appendix provides an end-to-end example on how this is done. In this example you will set up a Streams change table for changes made to the EMP table in the SCOTT schema. More specifically, you will capture all DML operations. Additionally, if the SAL column changes you will capture both the before and the after value of the salary. You then define the upload job on the Guardium appliance, the domains and the reports. This is a simple example but even highly complex examples will only change in the CDC definition; not in the Guardium setup. Additional will be mainly more columns for which the after values are required and more extra attributes that can associate these records with records inspected natively within Guardium.
The process described below uses Oracle 10g but is the same on 9i and 11g. Note that the example can be refined – e.g. for assigning fewer privileges to the users etc. Consult your DBA for more information on Streams.
Log onto Oracle and create a user:
SQL> create user gdmstreams identified by "0okmnhyy6";
User created.
SQL> grant dba to gdmstreams;
Grant succeeded.
Grant Streams privileges to the user:
SQL> begin
2 DBMS_STREAMS_AUTH.GRANT_ADMIN_PRIVILEGE(
3 grantee=>'gdmstreams',
4 grant_privileges => true);
5 end;
6 /
PL/SQL procedure successfully completed.
Assign privileges on the target table:
SQL> grant all on scott.emp to gdmstreams;
Grant succeeded.
Create the EMP_AUDIT table that will accept the change records from EMP:
SQL> create table emp_audit(
2 EMPNO NUMBER(4),
3 ENAME VARCHAR2(10),
4 JOB VARCHAR2(9),
5 MGR NUMBER(4),
6 HIREDATE DATE,
7 SAL NUMBER(7,2), -- this will be the old value
8 AFTER_SAL NUMBER(7,2),
9 COMM NUMBER(7,2),
10 DEPTNO NUMBER(2),
11 user_name VARCHAR2(30),
12 action VARCHAR2(30),
13 upd_date DATE);
Table created.
Grant access to the audit table:
SQL> grant all on scott.emp_audit to gdmstreams;
Grant succeeded.
Create the queue:
SQL> begin
2 DBMS_STREAMS_ADM.SET_UP_QUEUE(
3 queue_table=>'gdmstreams.streams_queue_table',
4 queue_name=>'gdmstreams.streams_queue');
5 end;
6 /
PL/SQL procedure successfully completed.
You only want change records for DML, not DDL. Makes sure your database is in ARCHIVEMODE and run:
SQL> begin
2 DBMS_STREAMS_ADM.ADD_TABLE_RULES(
3 table_name=>'scott.emp',
4 streams_type=>'capture',
5 streams_name=>'capture_emp',
6 queue_name=>'gdmstreams.streams_queue',
7 include_dml=>true,
8 include_ddl=>false,
9 inclusion_rule=>true);
10 end;
11 /
PL/SQL procedure successfully completed.
Tell the capture process that you want to know who made the change:
SQL> begin
2 DBMS_CAPTURE_ADM.INCLUDE_EXTRA_ATTRIBUTE(
3 capture_name=>'capture_emp',
4 attribute_name=>'username',
5 include=>true);
6 end;
7 /
PL/SQL procedure successfully completed.
Tell Oracle where to start the capture (replace on0satu with your database name):
SQL> declare
2 v_scn NUMBER;
3 begin
4 v_scn := DBMS_FLASHBACK.GET_SYSTEM_CHANGE_NUMBER();
5 DBMS_APPLY_ADM.SET_TABLE_INSTANTIATION_SCN(
6 source_object_name=>'scott.emp',
7 source_database_name=>'on0satur',
8 instantiation_scn=>v_scn);
9 end;
10 /
PL/SQL procedure successfully completed.
Now build the handler that will massage a change record in the format for the EMP table into the format of the EMP_AUDIT table (including the additional username information):
SQL> CREATE OR REPLACE PROCEDURE gdmstreams.emp_dml_handler(in_any IN ANYDATA) IS
2 lcr SYS.LCR$_ROW_RECORD;
3 rc PLS_INTEGER;
4 command VARCHAR2(30);
5 new_sal ANYDATA;
6 old_values SYS.LCR$_ROW_LIST;
7 BEGIN
8 -- Access the LCR
9 rc := in_any.GETOBJECT(lcr);
10 -- Get the object command type
11 command := lcr.GET_COMMAND_TYPE();
12
13 -- Set the command_type in the row LCR to INSERT
14 lcr.SET_COMMAND_TYPE('INSERT');
15 -- Set the object_name in the row LCR to EMP_DEL
16 lcr.SET_OBJECT_NAME('EMP_AUDIT');
17
18 -- Set the new values to the old values for update and delete
19 IF command IN ('DELETE', 'UPDATE') THEN
20 IF command IN ('UPDATE') THEN
21 -- Get the new salary
22 new_sal := lcr.GET_VALUE('new','SAL');
23 END IF;
24 -- Get the old values in the row LCR
25 old_values := lcr.GET_VALUES('old');
26 -- Set the old values in the row LCR to the new values in the row LCR
27 lcr.SET_VALUES('new', old_values);
28 -- Set the old values in the row LCR to NULL
29 lcr.SET_VALUES('old', NULL);
30 END IF;
31
32 -- Add a SYSDATE for upd_date
33 lcr.ADD_COLUMN('new', 'UPD_DATE', ANYDATA.ConvertDate(SYSDATE));
33
34 -- Add a user column
35 lcr.ADD_COLUMN('new', 'user_name',
36 lcr.GET_EXTRA_ATTRIBUTE('USERNAME') );
37 -- Add an action column
38 lcr.ADD_COLUMN('new', 'ACTION', ANYDATA.ConvertVarChar2(command));
39
40 -- Add the new salary information
41 lcr.ADD_COLUMN('new', 'AFTER_SAL', new_sal);
42
43 -- Make the changes
44 lcr.EXECUTE(true);
45 commit;
46 END;
47
48 /
Procedure created.
Create the DML handlers using the procedure:
SQL> begin
2 DBMS_APPLY_ADM.SET_DML_HANDLER(
3 object_name=>'scott.emp',
4 object_type=>'TABLE',
5 operation_name=>'INSERT',
6 error_handler=>false,
7 user_procedure=>'gdmstreams.emp_dml_handler',
8 apply_database_link=>NULL,
9 apply_name=>NULL);
10 end;
11 /
PL/SQL procedure successfully completed.
SQL> begin
2 DBMS_APPLY_ADM.SET_DML_HANDLER(
3 object_name=>'scott.emp',
4 object_type=>'TABLE',
5 operation_name=>'UPDATE',
6 error_handler=>false,
7 user_procedure=>'gdmstreams.emp_dml_handler',
8 apply_database_link=>NULL,
9 apply_name=>NULL);
10 end;
11 /
PL/SQL procedure successfully completed.
SQL> begin
2 DBMS_APPLY_ADM.SET_DML_HANDLER(
3 object_name=>'scott.emp',
4 object_type=>'TABLE',
5 operation_name=>'DELETE',
6 error_handler=>false,
7 user_procedure=>'gdmstreams.emp_dml_handler',
8 apply_database_link=>NULL,
9 apply_name=>NULL);
10 end;
11 /
PL/SQL procedure successfully completed.
Create the apply rule. This tells Oracle where to insert the massaged records. Again, replace on0satur with your database name:
SQL> declare
2 emp_rule_name_dml VARCHAR2(30);
3 emp_rule_name_ddl VARCHAR2(30);
4 begin
5 DBMS_STREAMS_ADM.ADD_TABLE_RULES(
6 table_name=>'scott.emp',
7 streams_type=>'apply',
8 streams_name=>'apply_emp',
9 queue_name=>'gdmstreams.streams_queue',
10 include_dml=>true,
11 include_ddl=>false,
12 source_database=>'on0satur',
13 dml_rule_name=>emp_rule_name_dml,
14 ddl_rule_name=>emp_rule_name_ddl);
15 DBMS_APPLY_ADM.SET_ENQUEUE_DESTINATION(
16 rule_name=>emp_rule_name_dml,
17 destination_queue_name=>'gdmstreams.streams_queue');
18 end;
19 /
PL/SQL procedure successfully completed.
You want this to continue even if there is an error, so:
SQL> begin
2 DBMS_APPLY_ADM.SET_PARAMETER(
3 apply_name=>'apply_emp',
4 parameter=>'disable_on_error',
5 value=>'N');
6 end;
7 /
PL/SQL procedure successfully completed.
Start the apply and capture processes:
SQL> begin
2 DBMS_APPLY_ADM.START_APPLY(
3 apply_name=>'apply_emp');
4 end;
5 /
PL/SQL procedure successfully completed.
SQL> begin
2 DBMS_CAPTURE_ADM.START_CAPTURE(
3 capture_name=>'capture_emp');
4 end;
5 /
PL/SQL procedure successfully completed.
You’re done!
Connect as scott:
SQL> connect scott
Enter password:
Connected.
SQL> select * from emp;
EMPNO ENAME JOB MGR HIREDATE SAL COMM DEPTNO
---------- ---------- --------- ---------- --------- ---------- ---------- ----------
7369 SMITH CLERK 7902 17-DEC-80 1100 20
7499 ALLEN SALESMAN 7698 20-FEB-81 1600 300 30
7521 WARD SALESMAN 7698 22-FEB-81 1250 500 30
7566 JONES MANAGER 7839 02-APR-81 2975 20
7698 BLAKE MANAGER 7839 01-MAY-81 2850 30
7782 CLARK MANAGER 7839 09-JUN-81 2964.5 10
7788 SCOTT ANALYST 7566 19-APR-87 3000 20
7839 KING PRESIDENT 17-NOV-81 6050 10
7844 TURNER SALESMAN 7698 08-SEP-81 1500 0 30
7876 ADAMS CLERK 7788 23-MAY-87 1100 20
7900 JAMES CLERK 7698 03-DEC-81 950 30
EMPNO ENAME JOB MGR HIREDATE SAL COMM DEPTNO
---------- ---------- --------- ---------- --------- ---------- ---------- ----------
7902 FORD ANALYST 7566 03-DEC-81 30000 20
7934 MILLER CLERK 7782 23-JAN-82 1573 10
13 rows selected.
Make a few changes:
SQL> update emp set sal=80 where EMPNO=7369;
1 row updated.
SQL> commit;
Commit complete.
Connect as another user and make a change:
SQL> connect system
Enter password:
Connected.
SQL> update scott.emp set SAL=300 where EMPNO=7902;
1 row updated.
SQL> commit;
Commit complete.
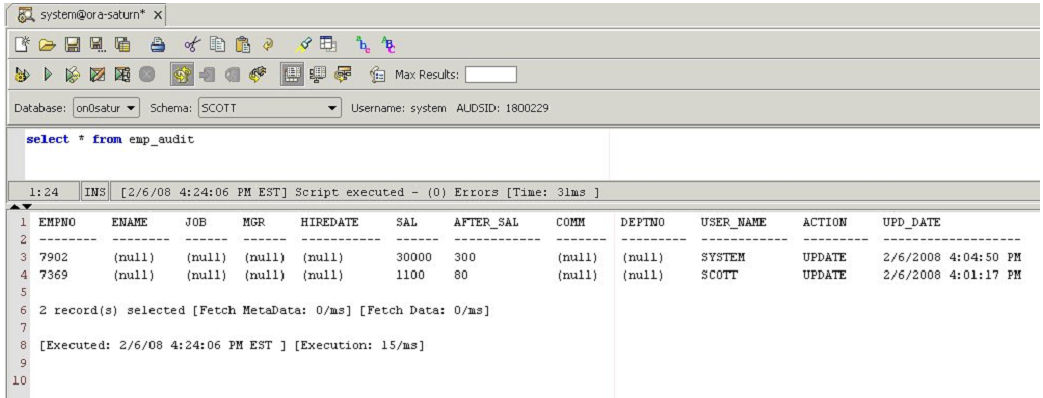
Now let’s check that it worked and that the records are in place:
Perfect!
It’s time to move to define the upload process.
Log onto the Guardium appliance as a user who has access to the upload facility (as installed, users with the user role have access).
Open the Custom Tables panel by clicking Monitor/Audit > Build Reports > Custom domain builder.
Click the Upload Definition button to open the Import Table Structure panel.
Enter EMP_AUDIT in both the Entity Desc and Table Name boxes.
Enter select * from EMP_AUDIT in the SQL Statement box.
Click Add Datasource, and define a datasource to access the EMP_AUDIT table you created in the previous steps. See the Datasources topic in the Common Tools book for instructions on defining datasources.
Click the Retrieve button
On the Custom Tables panel, click the Upload Data button.
On the Import Data panel, add a DML statement to delete the audit records you’ve already read. You can also manage this deletion elsewhere and you can also define conditions for deleting exactly the records read. For now, let’s use a feature within the Guardium system based on dates where the Guardium system remembers the last time data was brought back:
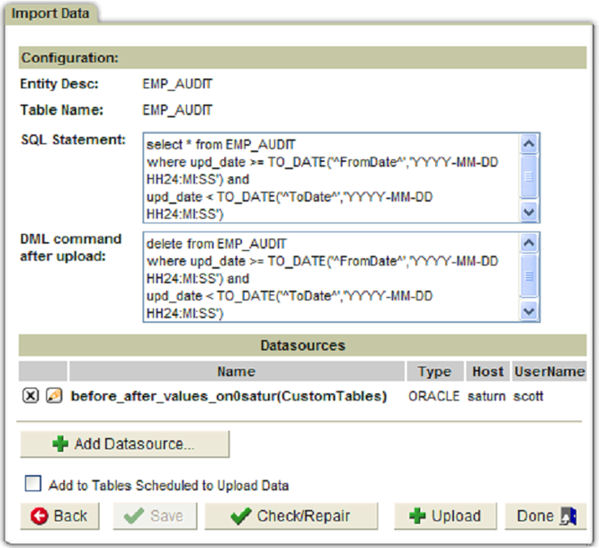
Normally you would define a schedule for the upload to occur by clicking the Add to Tables Schedule to Upload Data checkbox.
For now, just click Save, and then click Upload.
The data is now in your database.
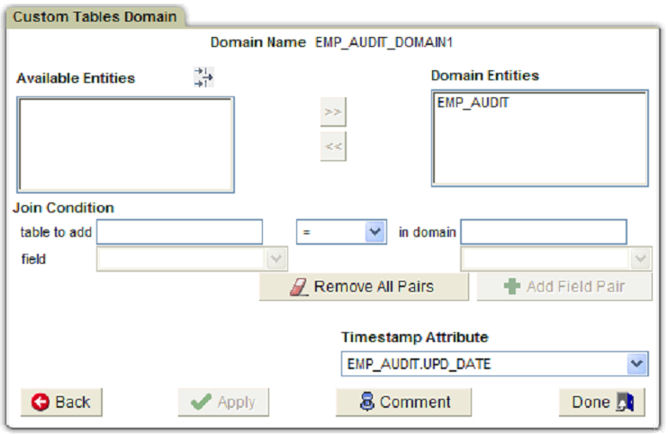
Back on the Custom domain builder, click on Domains and click on New.
Fill in a domain name (EMP_AUDIT_DOMAIN1, for example) and select the EMP_AUDIT entity.
Select EMP_AUDIT.UPD_DATE as the timestamp attribute and click Apply:
Click on the Build Reports tab again and click on the Custom query builder.
Select your domain and click Search.
Click New to generate a new report.
Fill in a Query Name and select the EMP_AUDIT entity.
Drag and drop all your attributes onto the report:
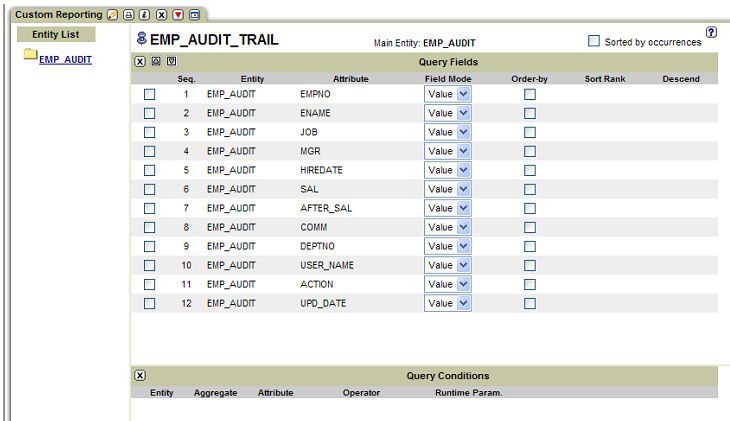
Click Save, then click Generate Tabular, then click Add to Pane.
Navigate to your new report on the My New Reports tab.
Click the  (Customize) button on your report panel,
and enter appropriate dates to view your data, which should look something
like this:
(Customize) button on your report panel,
and enter appropriate dates to view your data, which should look something
like this:
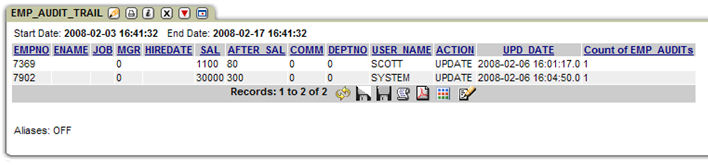
The before after values are displayed based on your capture definitions.